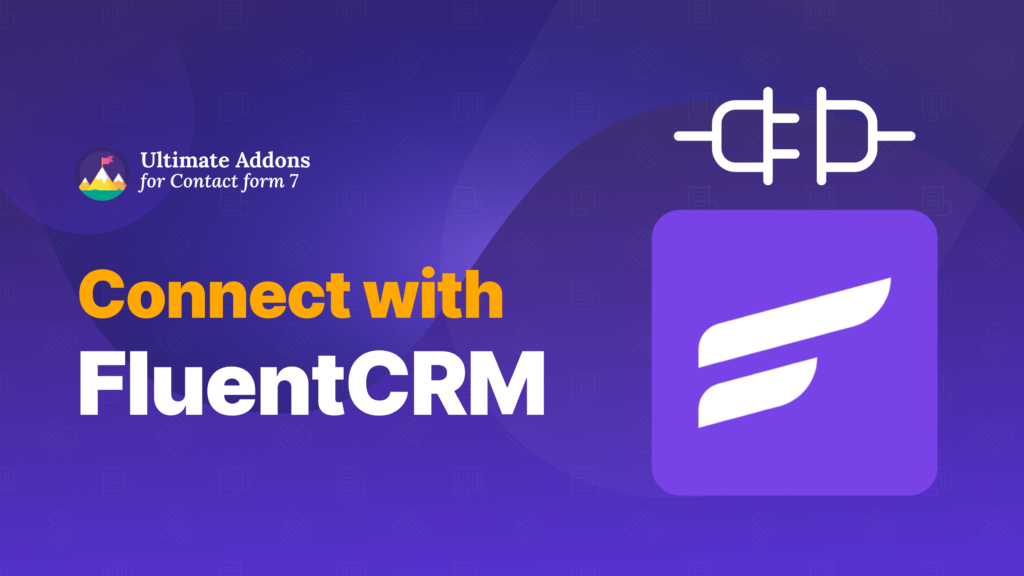
FluentCRM is one of the best CRM solutions for WordPress, allowing you to manage your customer relationships and automate email marketing seamlessly within your WordPress ecosystem. Essentially, it serves as an alternative to Mailchimp but operates entirely within WordPress.
Today, we’ll walk you through the process of connect with FluentCRM and Contact Form 7, so you can automatically collect email submissions from your forms and add them to your marketing funnel for automation tasks. This integration ensures that every form submission is captured and efficiently utilized for email campaigns, follow-ups, or any other automation you set up in FluentCRM.
Let’s dive into it.
What is FluentCRM?
FluentCRM is a self-hosted email marketing automation and customer relationship management (CRM) plugin designed specifically for WordPress. It allows businesses to manage leads, automate email campaigns, segment users, track engagement, and integrate with other WordPress tools, all within their own website, without relying on third-party services like Mailchimp or HubSpot.
Key Features of FluentCRM
Bellow we have listed the core and key features of the FluentCRM, you can get a sneak peek of the plugin easily.
Self-Hosted & Privacy-Focused
- Runs inside WordPress, meaning you have full control over your email lists, campaigns, and automation without monthly fees.
- Ensures data security and GDPR compliance since everything is stored on your website.
Email Marketing Automation
- Create and schedule email campaigns with a drag-and-drop email builder.
- Set up automated email sequences based on user actions like form submissions, purchases, or membership sign-ups.
- Supports A/B testing, email personalization, and dynamic content for better engagement.
Advanced Contact Segmentation & Tagging
- Organize contacts with tags, lists, and custom fields for targeted marketing.
- Automatically segment users based on activity, behavior, or purchase history.
Deep WordPress & WooCommerce Integration
- Seamlessly integrates with WooCommerce, Easy Digital Downloads (EDD), LearnDash, LifterLMS, MemberPress, and more.
- Automate cart abandonment emails, order confirmations, and product recommendations.
Contact Form 7 & Fluent Forms Integration
- Capture leads directly from Contact Form 7, Fluent Forms, Gravity Forms, WPForms, and more.
- Automate follow-up emails when a user submits a form.
How to connect Contact form 7 with FluentCRM? – The Step by Step Guide
Prerequisites
- Ensure that both Contact Form 7 and Ultra Addons for Contact Form 7 are installed on your WordPress site.
- Make sure you have downloaded and installed the FluentCRM Pro on your WordPress site. If you do not have one get a license from here.
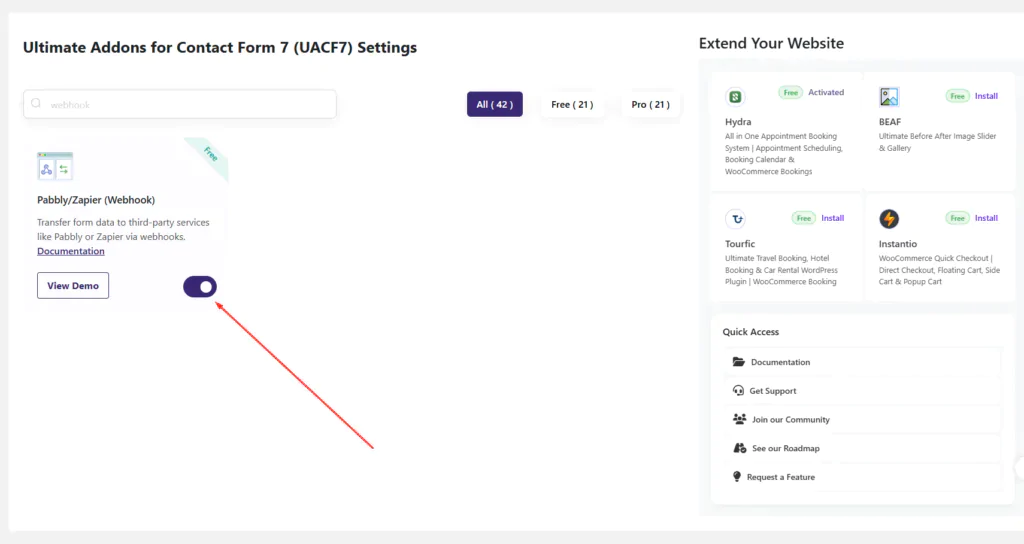
- Go to Ultra Addons > All Addons menu in your WordPress dashboard and enable Pabbly/Zapier (Webhook) checkbox
Step 1: Configuring the FluentCRM for the Integration
To integrate FluentCRM with Contact Form 7, you first need to create a list where all the form submissions will be stored. Additionally, you should create a tag to categorize and organize these entries efficiently.
Create a List for FluentCRM
To create a list in FluentCRM, navigate to your WordPress dashboard, then go to FluentCRM > Lists.
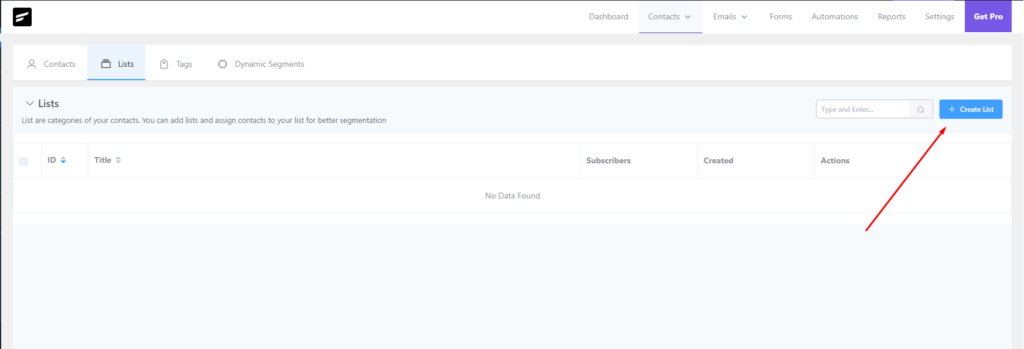
Click on the “Create List” button, and a popup will appear. In this popup, provide a Title and a Slug for your list. The Title will be the name of your list, making it easier to identify, while the Slug serves as a unique identifier for the system.

After entering the details, click on the “Create” button to finalize the list creation. This list will store all contacts collected from your Contact Form 7 submissions once the integration is set up.
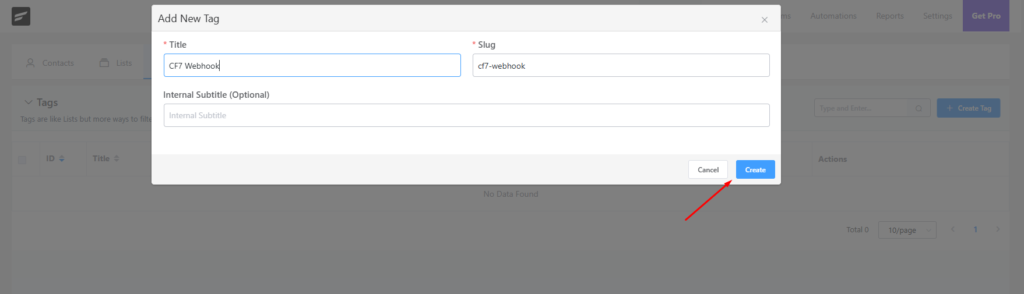
Create a Tag for FluentCRM
After creating a tag, now you need to create a tag.
To Create a tag, go to FluentCRM > Tags.
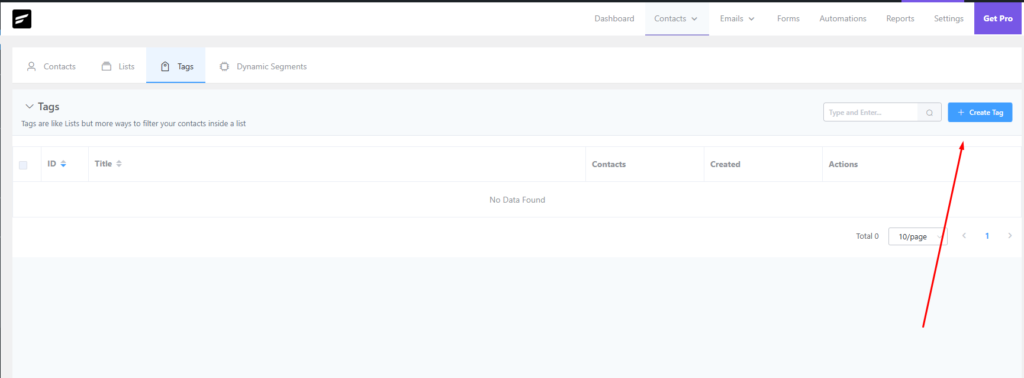
Click on the “Create Tag” button, and a popup will appear. Provide a suitable title and slug for the tag, then click on “Create.” This tag will be used to categorize the contacts collected from your Contact Form 7 submissions.
Create a Webhook and get the URL
After successfully creating lists and tags, navigate to FluentCRM > Settings > Incoming Webhook and click on “Create Webhook” to initiate the integration process.
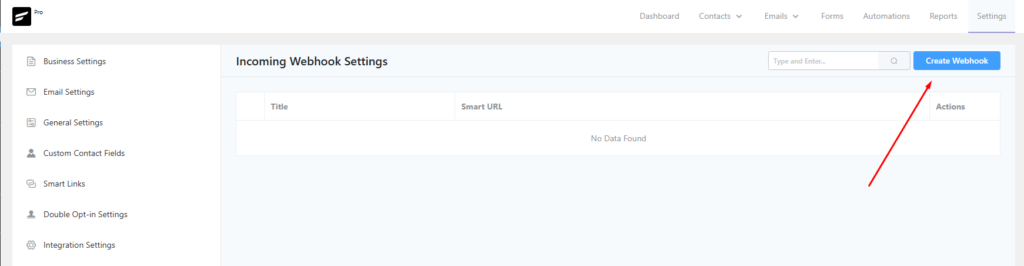
A popup will appear where you need to configure the webhook settings.
In the Name field, provide a suitable name for the webhook to identify its purpose easily. Under Default List, select the list you created earlier to ensure that all new submissions are added to this list automatically. Similarly, under Default Tags, choose the tag you created to categorize the contacts properly.
Lastly, in the Status field, select from Pending, Subscribed, or Unsubscribed, depending on how you want to handle the contacts added via this webhook.
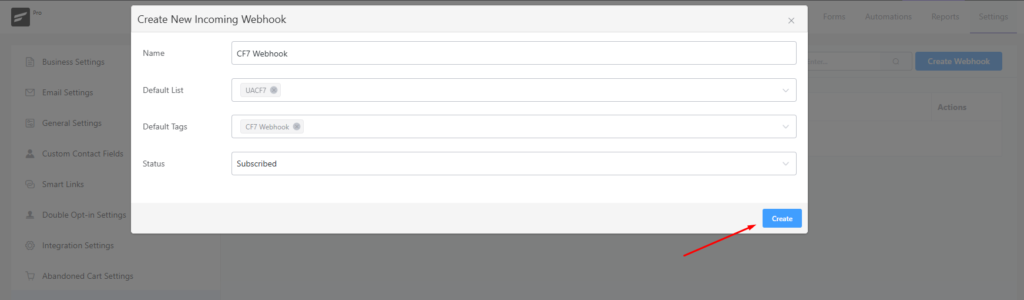
Once all the details are filled in, click Create to generate the Webhook URL, which will be required for the Contact Form 7 integration.
After successfully creating the webhook, you will find a settings section displaying the Webhook URL along with other options. Copy the Webhook URL, as we will need it later to configure Contact Form 7.
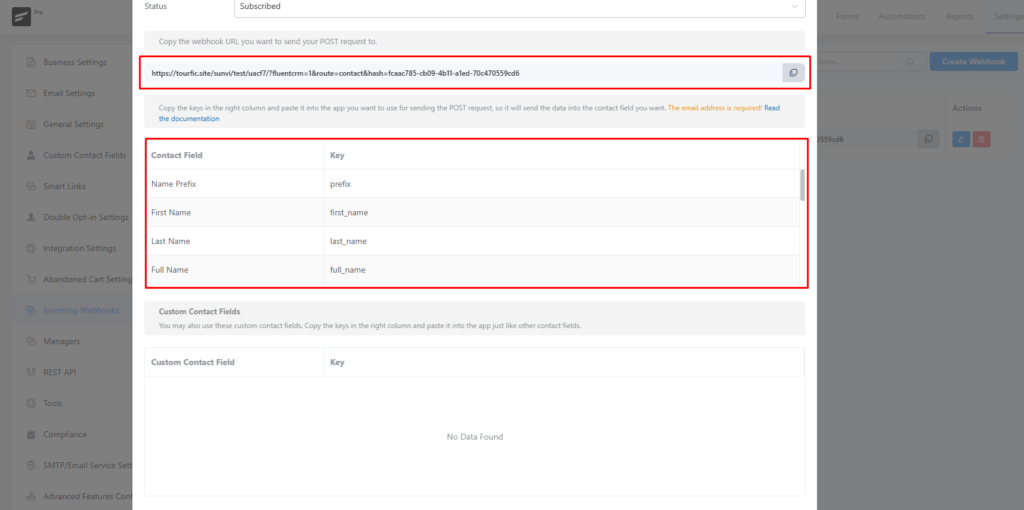
Additionally, you will see a table containing Contact Fields and Keys. These fields represent the data FluentCRM expects to receive from the form submission. To ensure proper data transfer, we need to map these keys with the respective fields in Contact Form 7, so that the submitted details are correctly added to the appropriate list and tags in FluentCRM.
For this demonstration, I will only use the “full_name”, “email”, and “phone” keys to map the fields with Contact Form 7. These keys will ensure that the submitted form data correctly transfers to FluentCRM, adding the user’s name, email, and phone number to the selected list and tags.
Now, let’s proceed to configure Contact Form 7 to send data to FluentCRM using the webhook.
Step 2: Configuring the CF7 Webhook Settings.
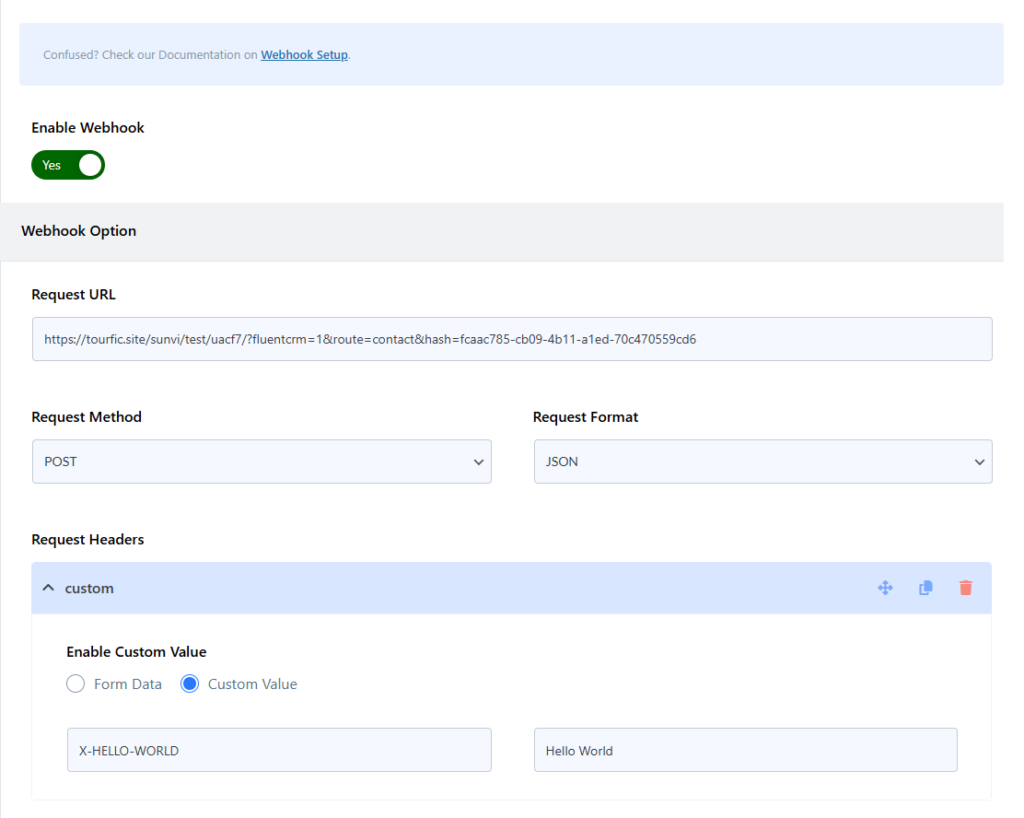
After obtaining the webhook URL, navigate to Ultra Addons for CF7 Options > Webhook and toggle the “Enable Webhook” option to ON.
Please note that without enabling this option, the webhook feature will not work, and your form data will not be sent to FluentCRM.
After enabling the Webhook option, paste the Webhook URL that we obtained in Step 1 into the “Request URL” field. This will ensure that form submissions are sent to FluentCRM for processing.
Request Method: To send data to fluentCRM, you need to use the POST method. Select POST from the dropdown menu to ensure the data is correctly transmitted.
Request Format: FluentCRM supports both JSON and Form Data as data formats. Choose the format that best suits your needs. If you’re dealing with structured data, JSON is recommended, while Form Data works well for standard form submissions.
Request Headers: This option allows you to send any required headers or authentication tokens along with your webhook request. If FluentCRM requires specific headers for authentication or data processing, you can add them here. For this demonstration, I am creating a test header to send to FluentCRM, but you can customize it according to your needs.
Request Body: This section defines the data you want to send to FluentCRM. Here, you need to configure the form fields and assign appropriate keys to ensure the correct information is transferred. Each field in your Contact Form 7 form should be mapped to a corresponding key that FluentCRM will recognize. This setup allows seamless data transfer, ensuring that all relevant form submissions are properly received and processed on FluentCRM end.
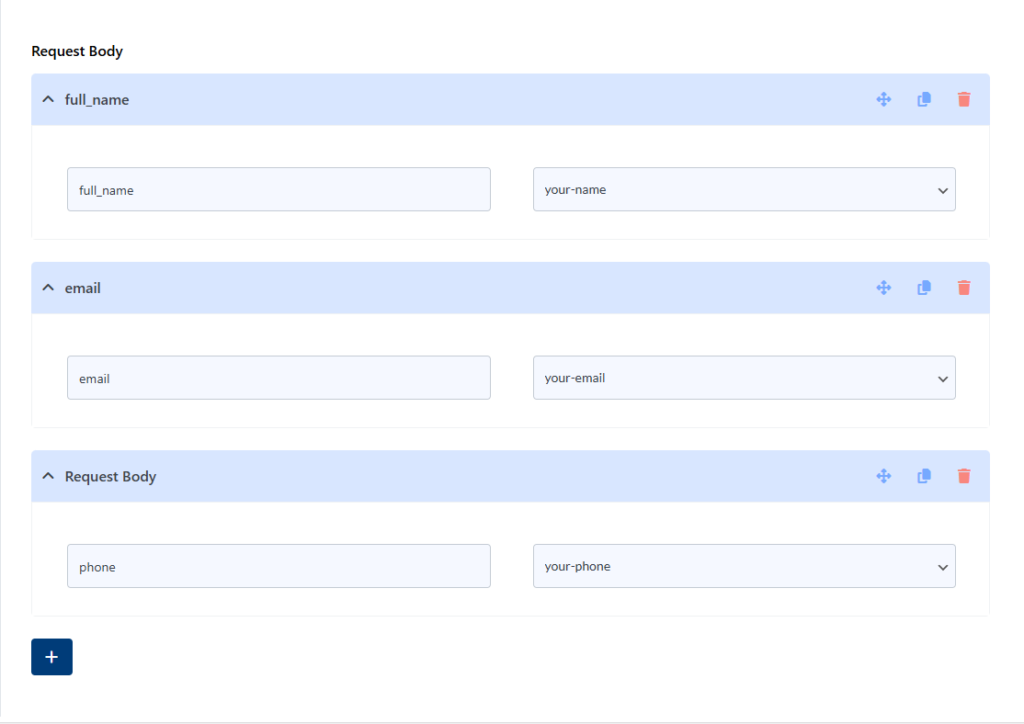
here is my fields and keys.
After setting up everything correctly, click on the “Save” button to apply the form settings. Once the settings are saved, it’s time to test whether the data is being sent properly.
Step 3: Testing the connect with FluentCRM Settings
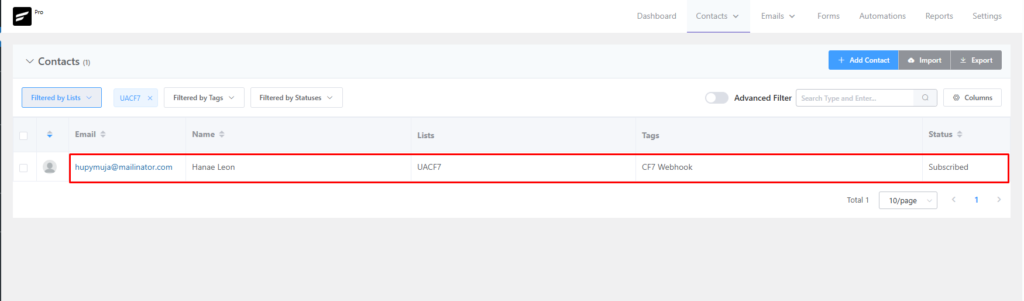
Now, after submitting some dummy data, I can confirm that the data has been successfully sent and captured by FluentCRM List. Below, you can see that all the form fields and values have been received correctly in the fluent crm list. This confirms that the webhook integration between Contact Form 7 and FluentCRM is working as expected.
Video Guide
You can check the video tutorial for more info about connect with FluentCRM.
Also you can check our other webhook guides:
Final Words
Integrating Contact Form 7 with FluentCRM is a powerful way to automate lead capture, nurture customer relationships, and streamline email marketing efforts—all within WordPress. By linking Contact Form 7 submissions directly to FluentCRM, you can automatically add leads to your email lists, segment users based on form responses, and trigger personalized email sequences without any manual work.
This seamless connection ensures efficient data collection, real-time follow-ups, and improved customer engagement, helping businesses boost conversions and build lasting relationships. Whether you’re managing newsletter signups, sales inquiries, or event registrations, FluentCRM’s automation features make it easy to track, segment, and communicate with your audience effectively.