“How to perform the Contact Form 7 redirect” is a commonly asked question among many business owners with WordPress websites. You may also have this question in mind when you try to set up the redirection.
However, the problem arises when you don’t find an easy method to finish setting up redirection. Chances are you might follow a challenging route for web page redirection and end up in a mess, resulting in hiring developers.
So, isn’t there a simple and easy method for redirecting web visitors? Fortunately, yes, and there are two ways that you’re about to discover in this article.
Firstly, we’ll talk about the importance of redirecting users to a specific page.
Next, we’re going to show you how to redirect users using a plugin.
After that, you will see a bonus tip to set up conditions for the redirects.
Finally, we’ll see how to set up redirections without a plugin.
Don’t forget to sit comfortably and grab a cup of coffee to complete the reading.
Now, let’s begin with.
Why do you need to redirect users to a specific page?

You may have varying perspectives regarding the redirection to specific web pages. Sometimes, you may want to give your visitors a customized user experience, while you may prefer extending warm greetings during other periods.
Therefore, you can redirect customers to different web pages. By doing so, you can make your visitors feel special while keeping web visitors engaged in their websites.
Another reason to use page redirection can be to inform users that you receive users’ submitted data. Hence, all these factors determine how crucial web page redirection is.
The information mentioned above will help you realize how it’s imperative to redirect users to a specific page.
Now, let’s learn how to redirect web visitors to different pages once they submit the forms using Contact Form 7.
Contact Form 7 redirect – How to redirect after submission with a plugin
Although you can accomplish the page redirection task without a plugin, we recommend you use a plugin to redirect users to varied pages.
Why use a plugin? Simple – To save time and effort.
On the contrary, you’ll walk a more complicated route to redirect users to web pages if you do not use any plugin. Simply put, you’ll use a client-side scripting language like Javascript to redirect users to a web page!
Therefore, if you aren’t a programming geek, you can use a plugin like Ultra Addons For Contact Form 7 to redirect visitors to diverse web pages!
That said, here are all the steps you need to follow to redirect users to a specific page using a plugin.
Step 1: Install Ultra Addons For Contact Form 7
First, you need to install Ultra Addons For Contact Form 7. To do so, go to WordPress Admin Dashboard and then navigate to Plugins > Add New Plugin.
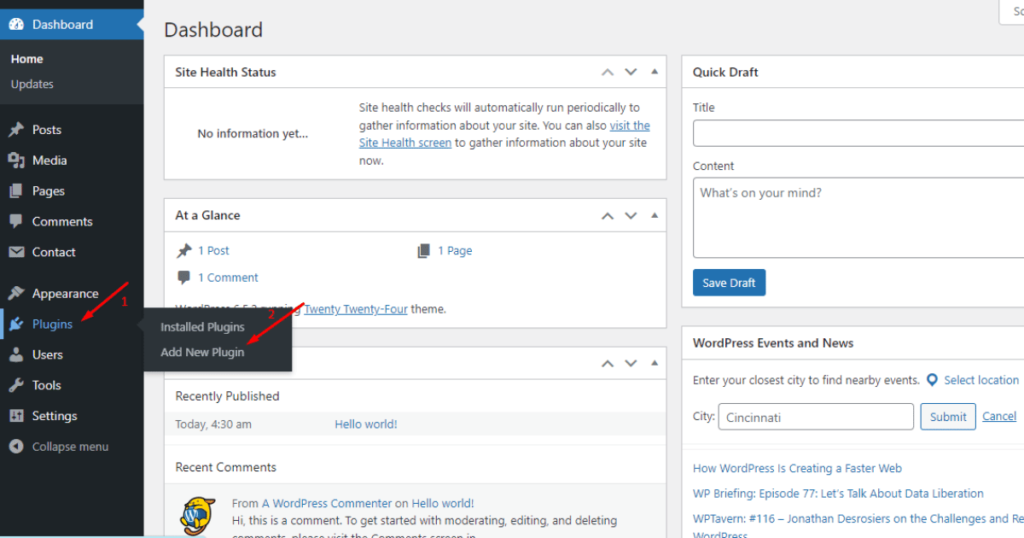
Then, search with the keyphrase “Ultra Addons For Contact Form 7” in the search field.
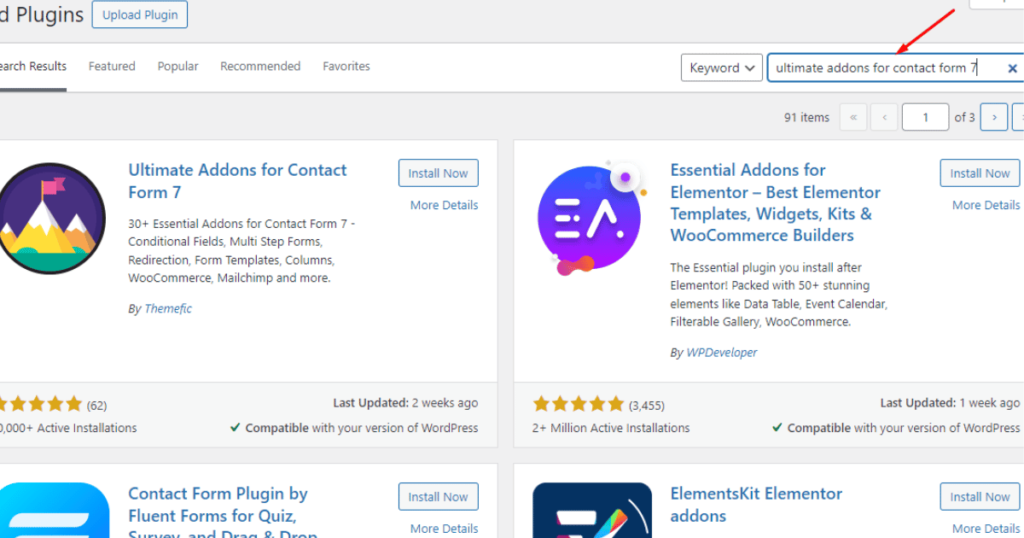
Afterward, spot the plugin and hit the Install Now button.
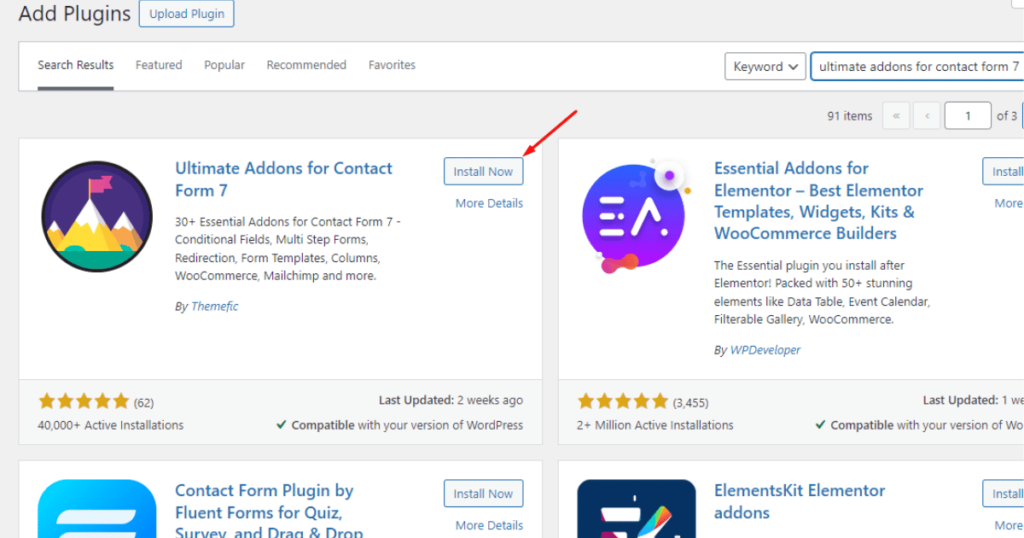
Then, click the Activate button.
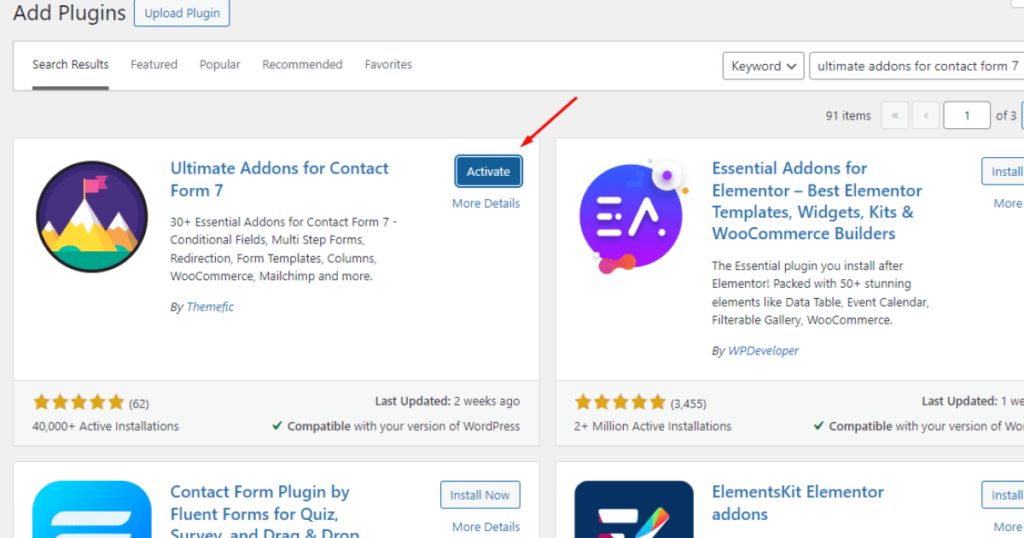
Okay, you have just installed Ultra Addons For Contact Form 7.
Step 2: Configure the basic settings
Once you complete the installation, you’ll see a UACF7 Setup page similar to the screenshot below.
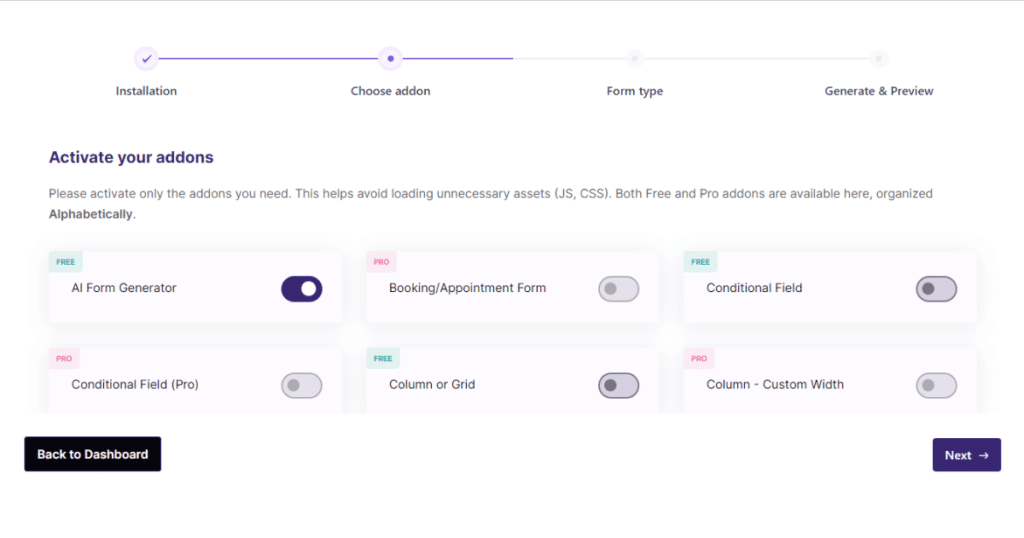
Here, you need to toggle on a few addons of Ultra Addons for Contact Form 7 according to your preferences.
We’ll enable the Redirection addon since we’ll redirect users to a different web page. Hence, we’ll scroll down a little and activate that addon.
N:B: the Redirection Pro (Conditional Redirect + WhatsApp Integration) addon will automatically activate if you have the paid version.
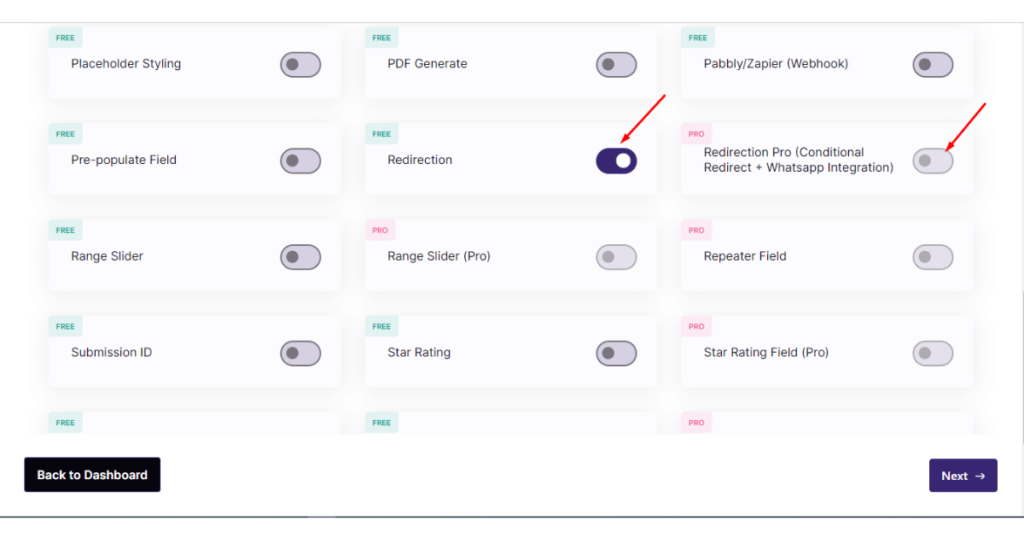
After activating your desired addons, click the Next button.
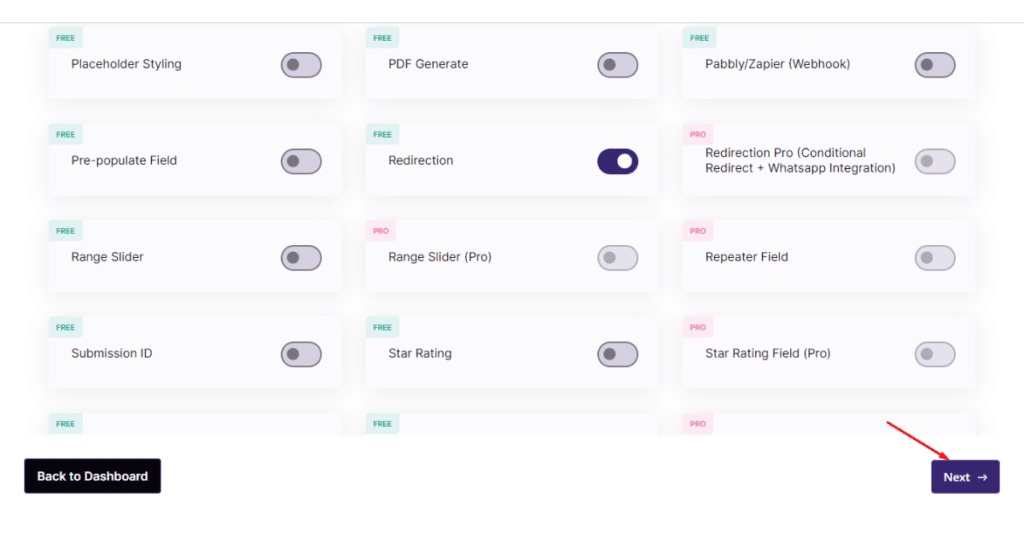
The Setup page will take you to a new AI Form Generator page. You can use this feature to automatically create a form or go with the manual form creation.
We won’t create any form this time. Thus, we’ll hit the Back to Dashboard button.
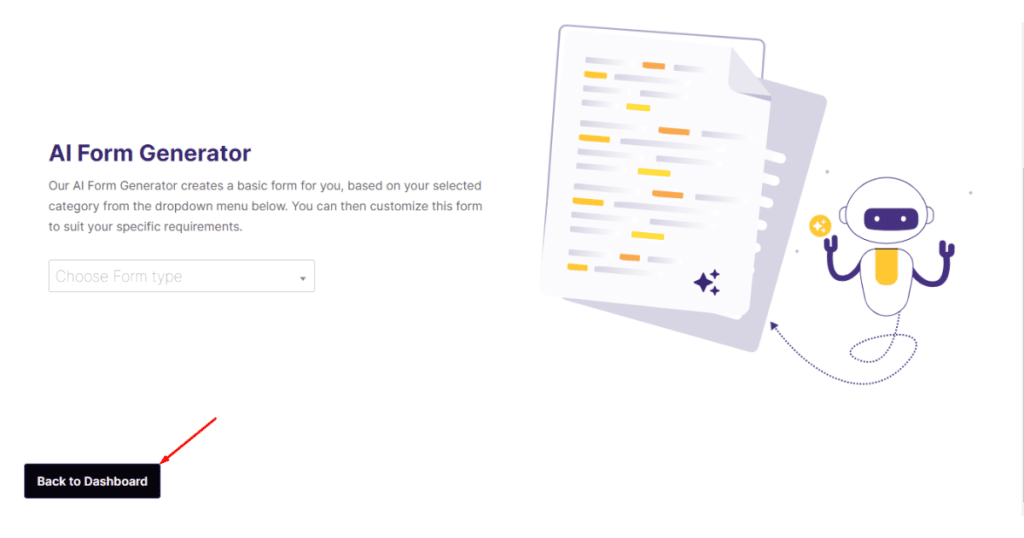
Boom! You have successfully activated the Redirection addon. It’s time to work with Ultra Addons For Contact Form 7 for page redirection.
Step 3: Configure Contact Form 7 redirect to thank you page
Page redirection with Ultra Addons for Contact Form 7 feels like a piece of cake. Here’s how you’ll do it.
First, create a form if you don’t have one or use an existing one.
Please read our Contact Form 7 Style guide if you need help with contact form creation and stylization.
In this case, let’s use an existing newsletter sign-up form. We aim to send users to the thank you page when they subscribe to the newsletter.
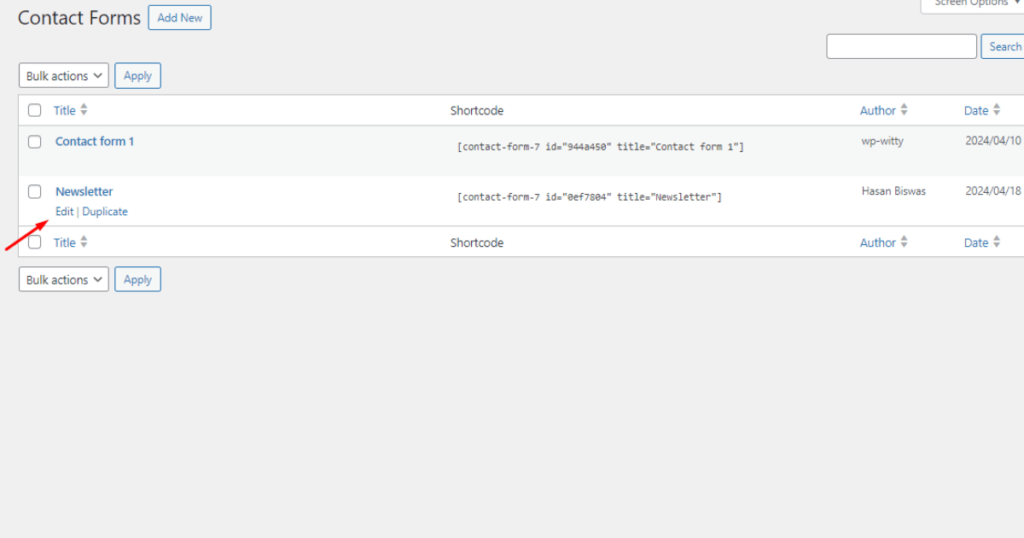
To do so, we’ll go to WordPress Admin Dashboard and then head to Contact > Contact Forms.
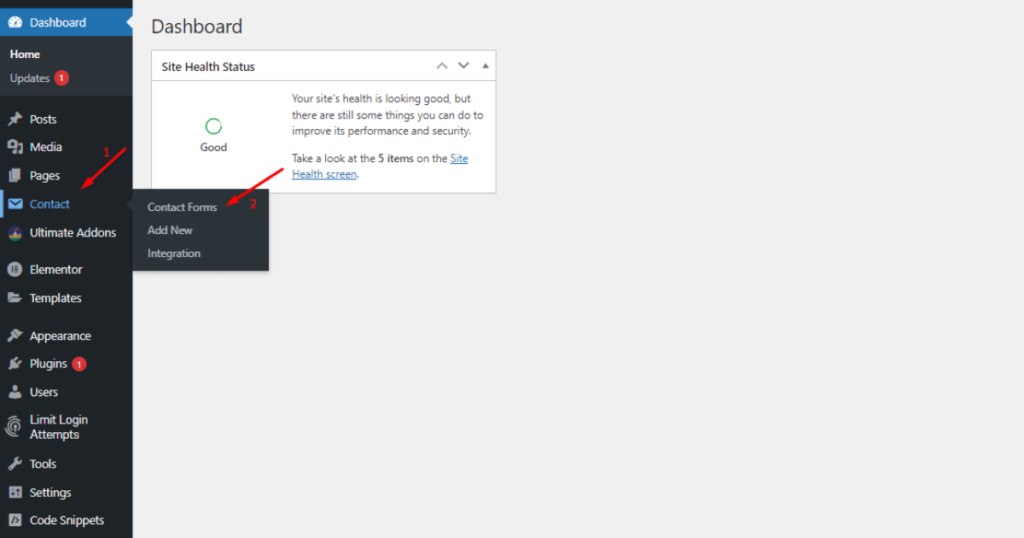
After that, we’ll hover over to a form (we want to work on) and notice the Edit button appearing. Then, click Edit.
We’ll now see the form editor.
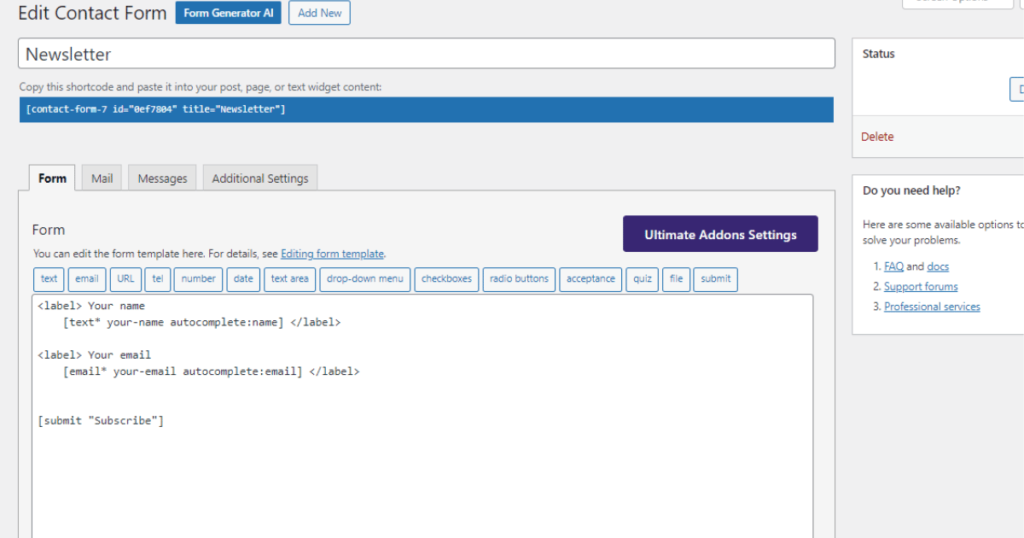
Scroll down a little, and you’ll notice features of Ultra Addons For Contact Form 7. Here, you can see all the features of addons you’ve enabled during the plugin installation.
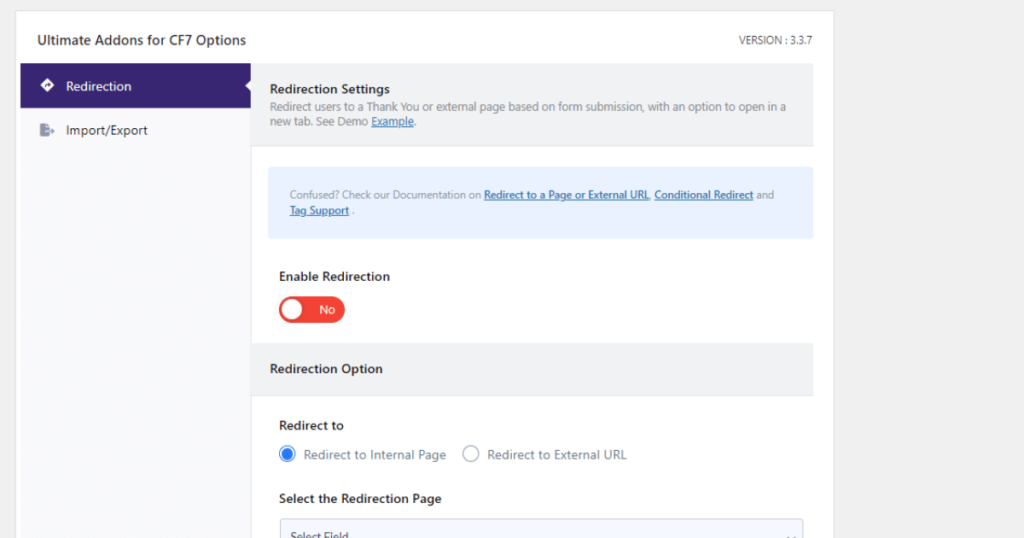
At this point, we’ll toggle on the Enable Redirection feature.
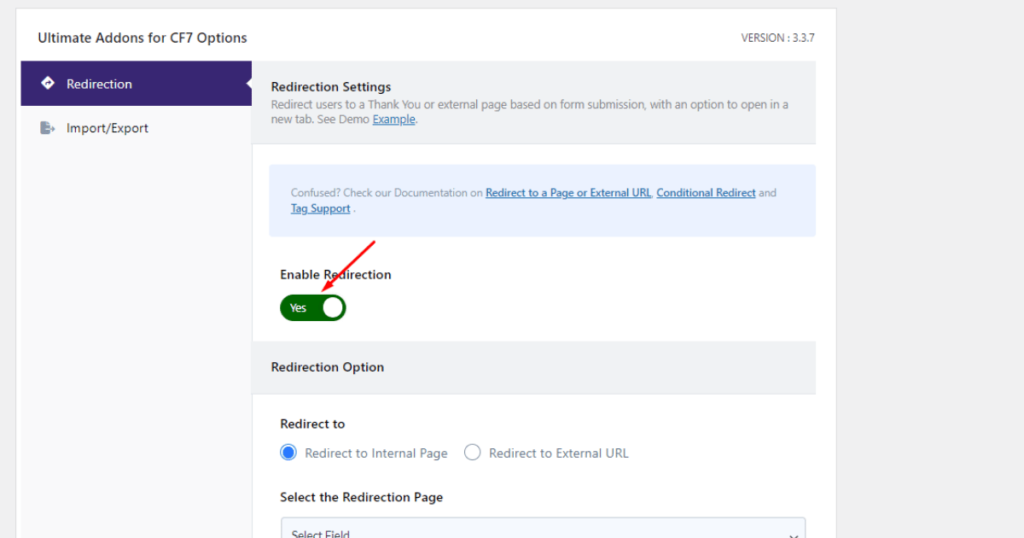
Right now, you can choose one of the radio buttons from the Redirection Option section.
You can select the Redirect to Internal Page radio button to redirect users to an internal page.
Conversely, choose the Redirect to External URL radio button if you want to send users to an external webpage.
But we’ll stick to the first option.
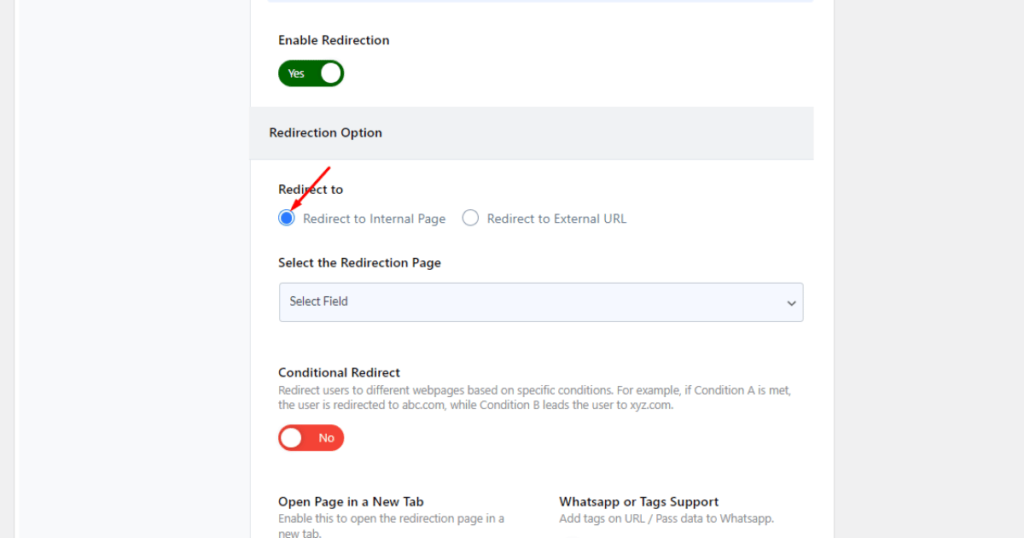
Afterward, let’s select the page where we’ll redirect users.
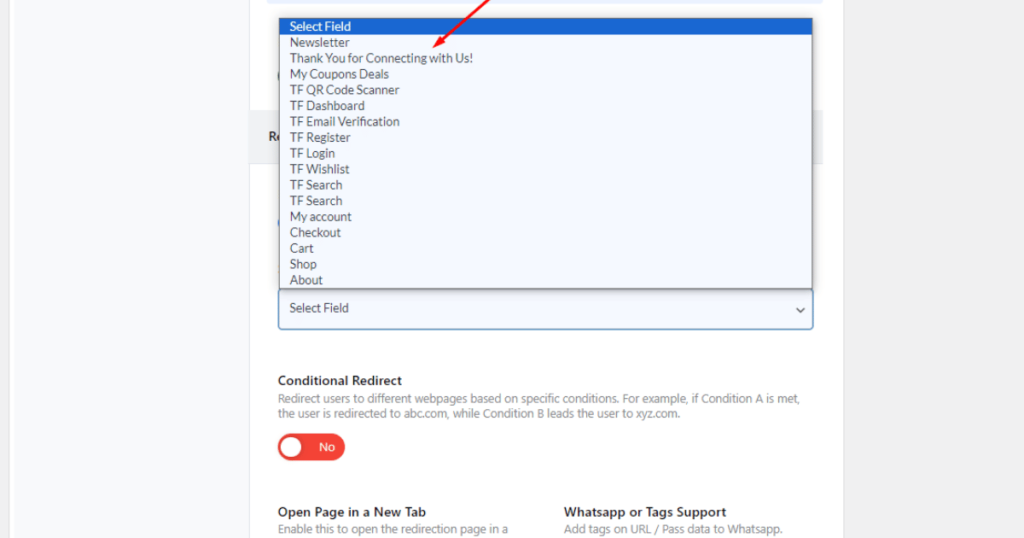
Scroll down and hit the Save button.
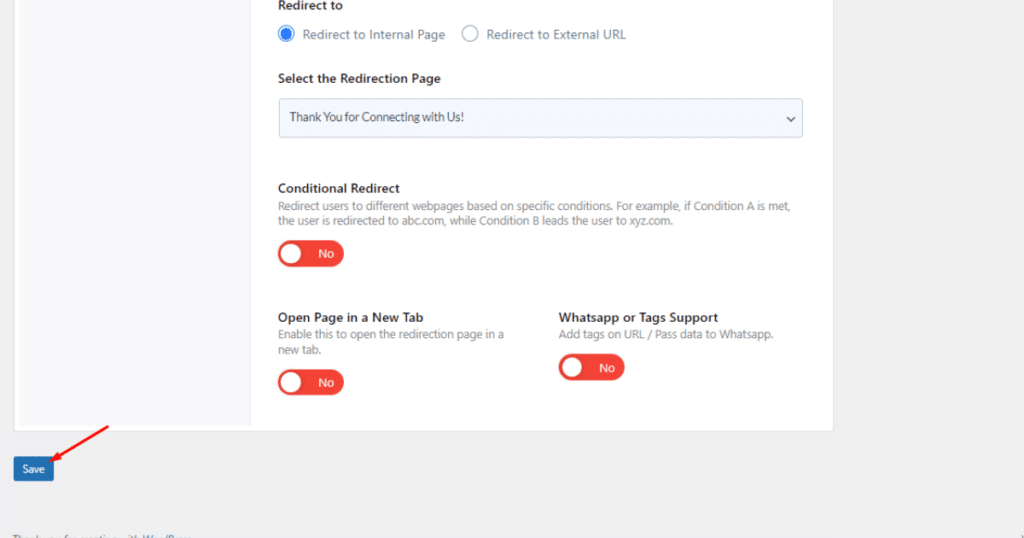
There you go! You’ve done the technical part of the Contact Form 7 redirect to the “Thank You for Connecting with Us!” page. Let’s see it in action.
Bonus: Contact Form 7 conditional redirect
You can now redirect web visitors to specific web pages with Ultra Addons For Contact Form 7. But who knows, there may come a time when you need to set conditions for users.
You need to send them to a particular web page upon users meeting certain conditions. Let’s say you prefer redirecting users whose names start/contain John to the thank you page.
How are you going to do this? Well, let Ultra Addons For Contact Form 7 be the rescuer.
With this tool, you can easily create conditions and perform complicated tasks like conditional redirects.
Here’s how it works.
Navigate to the WordPress Admin Dashboard > Contact > Contact Forms.

Then, hover over a form and select the Edit option of a form you want to customize.

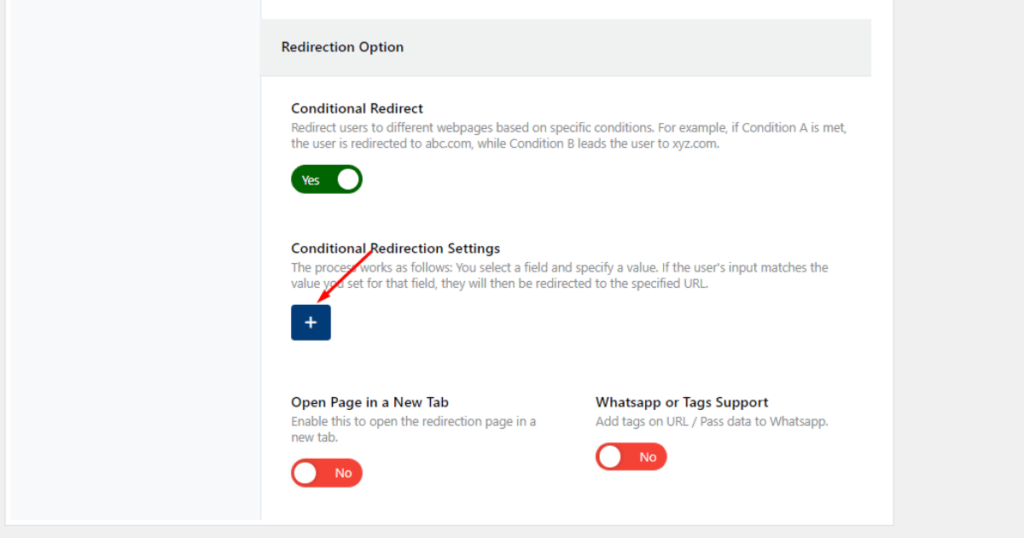
You’ll now see the form editor. Scroll down and enable the Conditional Redirect feature of UAFC7.
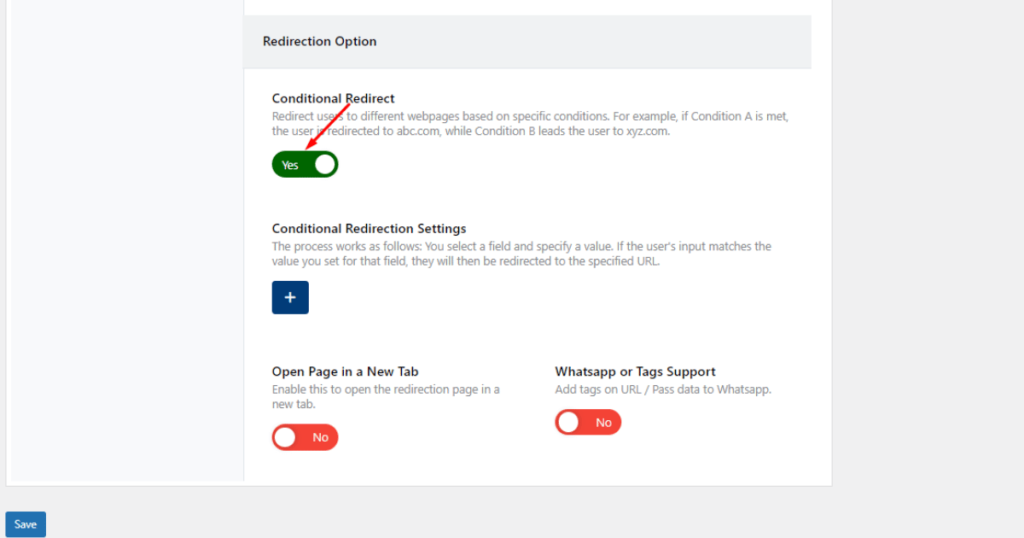
Then, click the ‘+’ icon to set a condition. Remember that you need to click this icon every time you want to set a new condition.
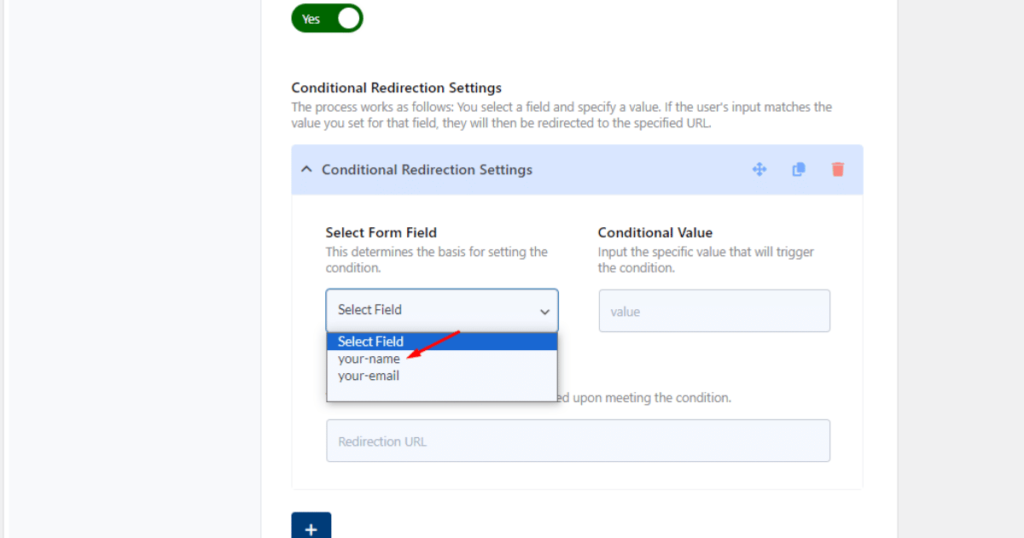
At this point, you need to select a form field on which you want to set a condition. We’ll choose the “your-name” field.
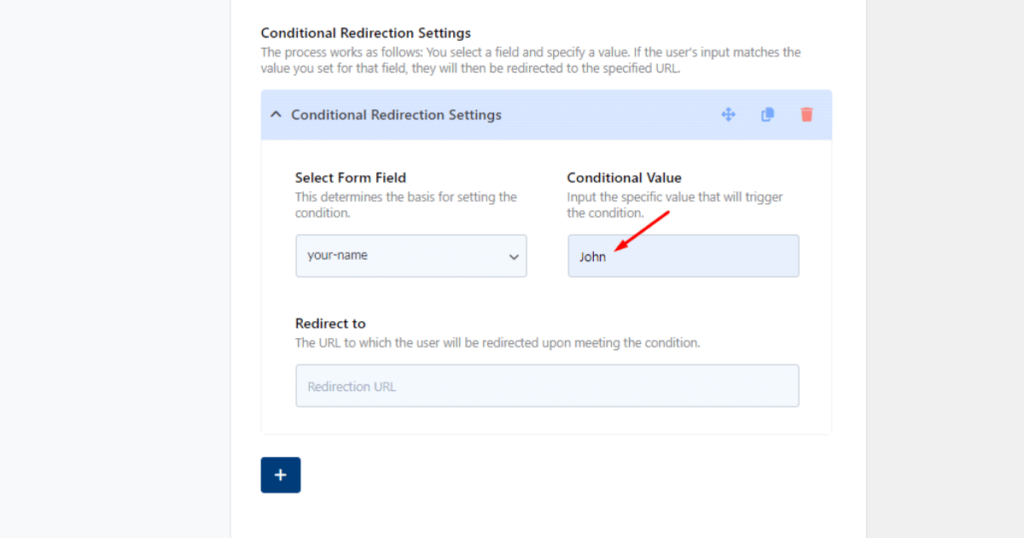
Then, type the name which triggers the condition in the Conditional Value field. For example, we’ll write ‘John.’
Finally, insert/paste the URL of a page where you want to redirect users in the Redirect to field.
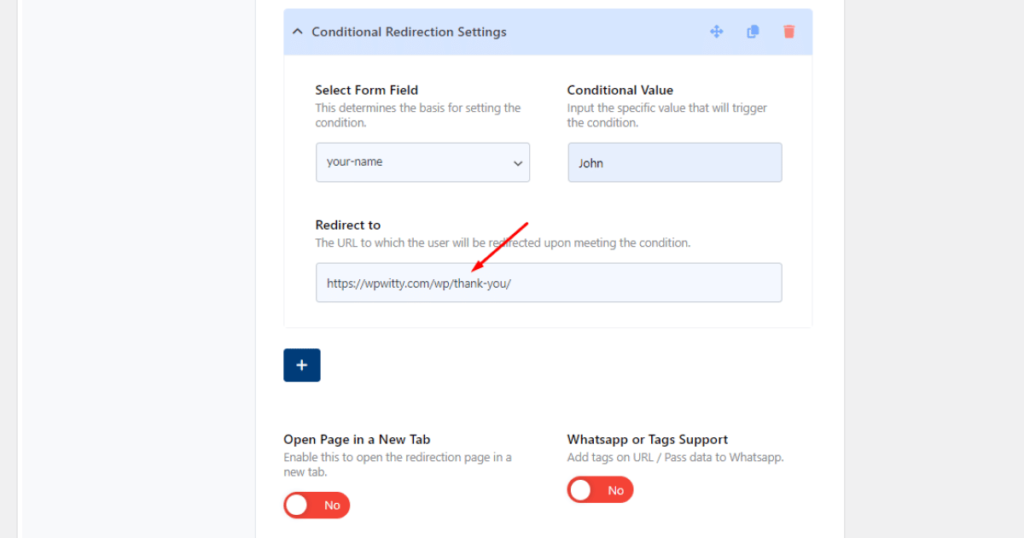
Afterward, scroll down and click the Save button.
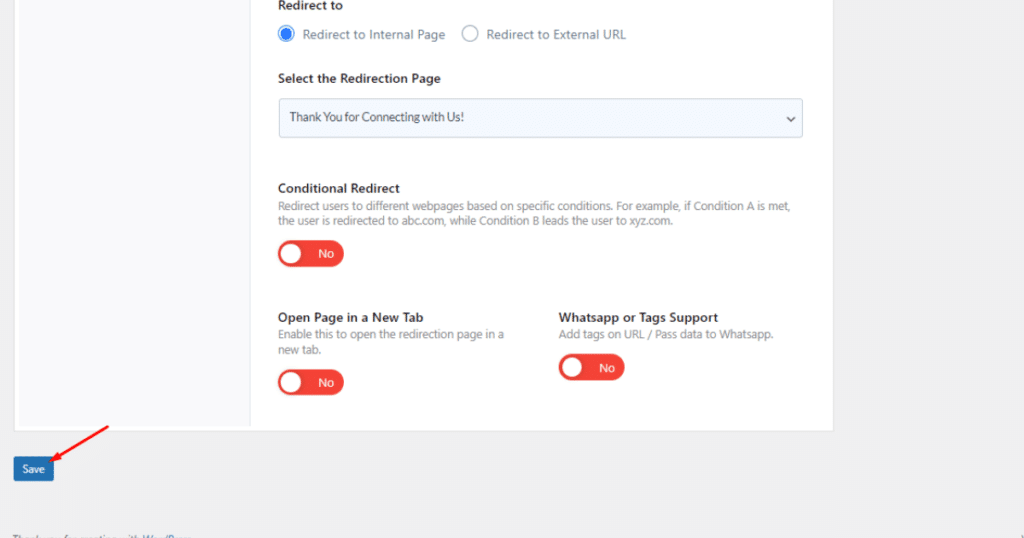
Okay, we’ve done everything regarding the conditional redirect. It’s time to check if it is working fine.
So, check the video below to glance at the end result of our work.
Contact Form 7 redirect after submission without a plugin
You may read and follow the methods outlined in this section if you love working with Javascript and don’t want to use any plugin for redirection purposes.
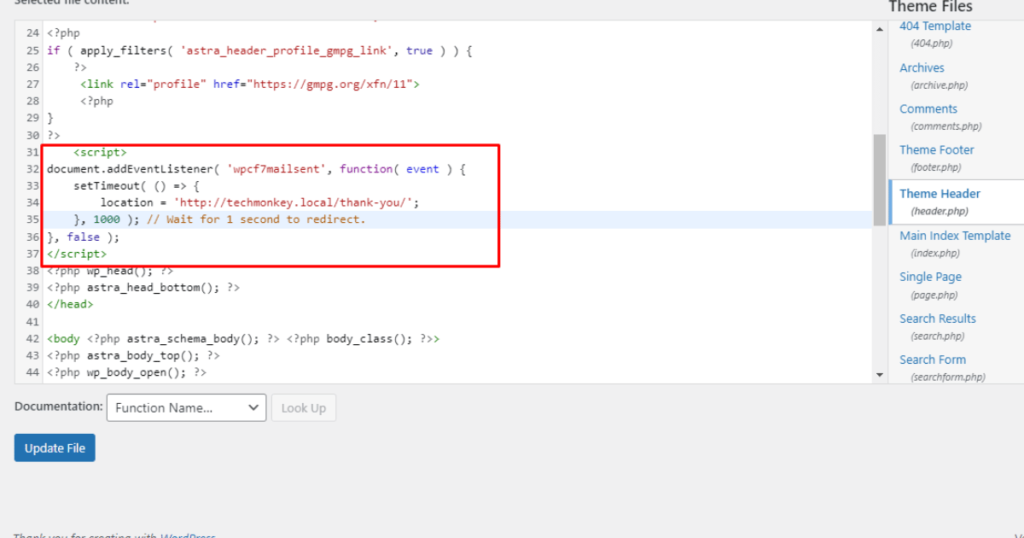
So, to redirect web visitors to a different URL when they submit a form with Contact Form 7, you need to embed the Javascript code below into your theme’s template file.
<script>
document.addEventListener( 'wpcf7mailsent', function( event ) {
    setTimeout( () => {
        location = 'http://yourdomain.com/';
    }, 1000 ); // Wait for 1 second to redirect.
}, false );
</script>
N:B: Put your website URL (the page where you want to send visitors after form submission) under the location in place of http://yourdomain.com/.
To embed the code to the theme’s template file, go to the WordPress Admin Dashboard > Appearance > Theme File Editor.
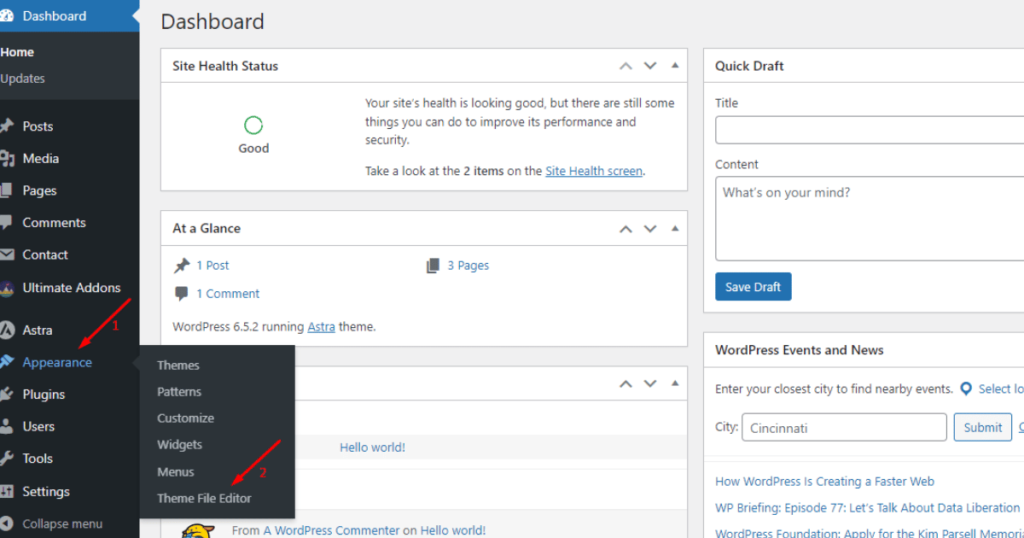
Note: You can find the Theme File Editor under Tools or Appearance, depending on your theme.
You now need to find the theme header file. Search for it in the right sidebar, which is titled Theme Files.
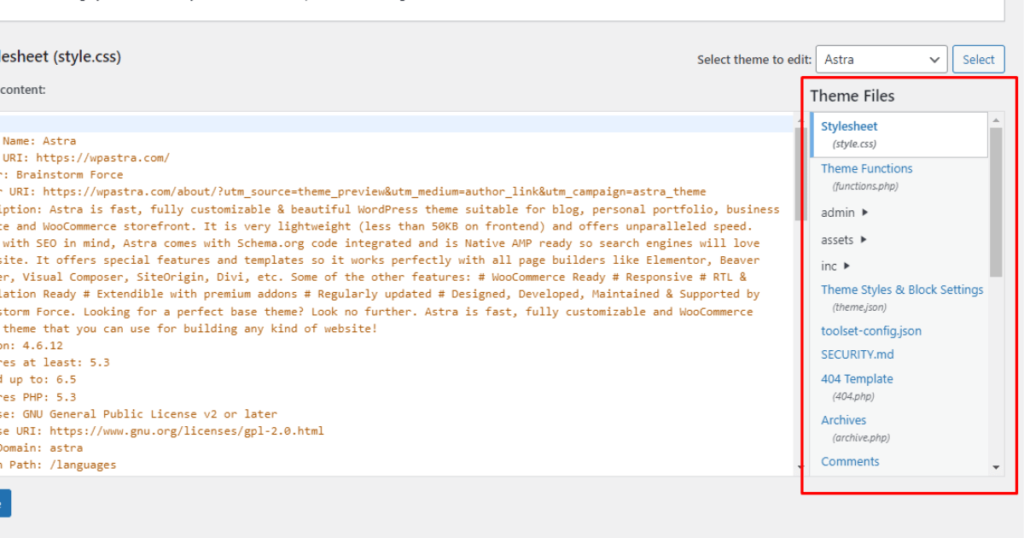
Next, select Theme Header or header.php file.
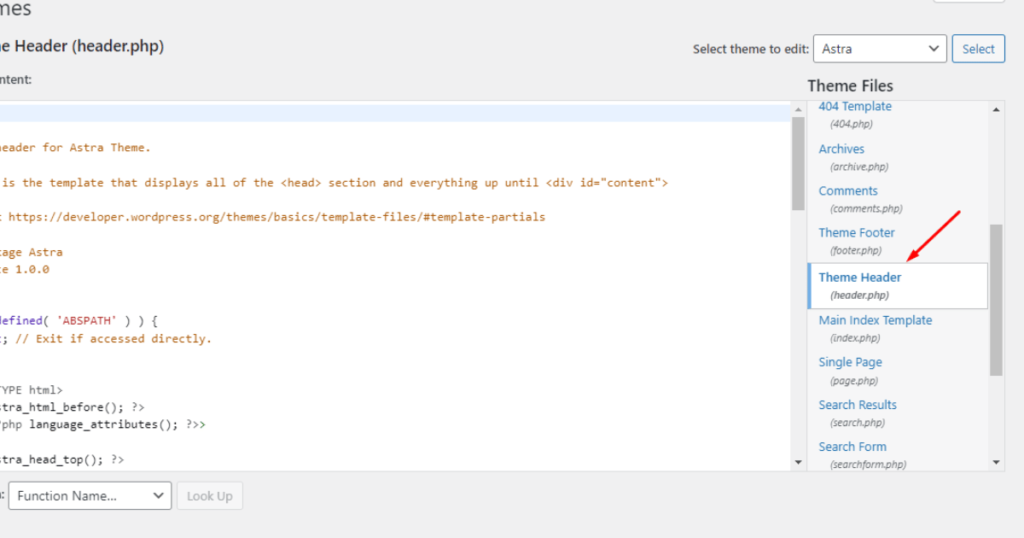
Then, seek the “wp_head()” function, as we’ll insert the redirection code snippet above this function.
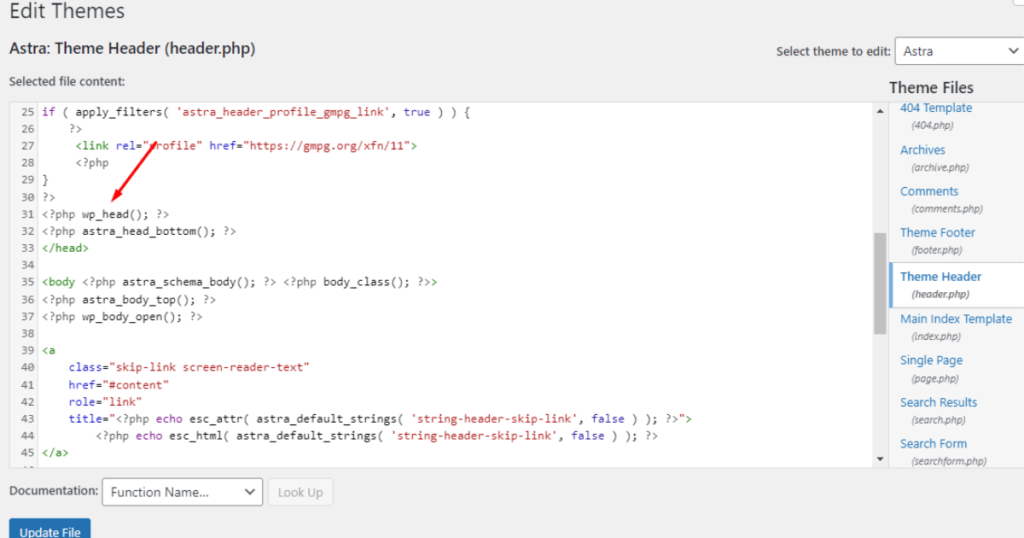
Paste the code snippet right above the “wp_head ()” function.
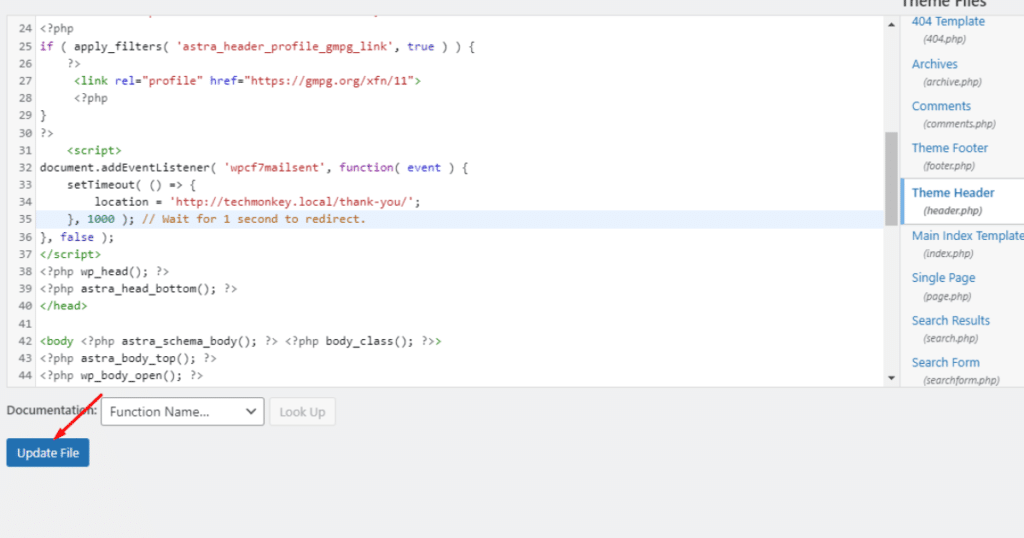
Finally, click the Update File button.
Congrats! You’ve made it. It’s checking time, so watch the video below to know how this redirection works.
Final words
As you can see, implementing the Contact Form 7 redirection is quite a simple task if you use an appropriate plugin like Ultra Addons For Contact Form 7.
With a few clicks, you can easily set up the redirection and send web visitors to your preferred pages when they submit a form.
However, alongside redirection, this plugin will help you do many other complicated tasks related to Contact Form 7.
We encourage you to explore this plugin’s features on your own to figure out what it can do. You can read our other blog posts and documentation and watch videos to know more about this tool.
